I have made an updated version of this post here: https://nucco.org/2025/10/desktop-mode-in-google-pixels-8-android-16-sept-2025-patch.html . The short summary is that as of 2025-10-11, the experience is much improved and you can conceivably use desktop mode for casual web browsing without much trouble, so long as you have a setup that can charge your phone while docked.
— The original post continues below — This blog post was painstakingly composed using the Desktop Mode of the Google Pixel 8 with a 24-inch monitor, a keyboard, a mouse and an i-Tec USB C dock.
The feature just about works, but there is some way to go yet before you can forgo buying a laptop.
I needed to enable the following settings in the Developer Options as well: – Enable freeform windows on secondary display – Enable freeform windows – Enable non-resizable in Multi-Window
One of those settings required a restart of the phone, and I’m not certain that they are all required, however, I there is a limit to how much time and effort I’m willing to invest into this trivial detail.
One of the immediate bugs I faced was that while the keyboard and mouse were detected on initial connection, the mouse was constrained to the mobile phone screen only, leaving me with no way of interacting with the external display. It wasn’t until I went into the phone settings, found “External Display”, and toggled the rotation to 90 Degrees and back to Standard that the mouse appeared on the external display.
From this point forward, I was able to launch apps. I straightaway launched Firefox and began composing this post. There is a persistent keyboard bar that shows up, possibly related to auto suggestions and language settings that I could not disable, even though I had an external keyboard. I was however able to tuck it away into a corner of the screen.
Once I maximized an app, I could not figure out how to return it to a floating window size, nor how to bring back the menu to search for and launch a new app.
The external monitor display settings don’t appear to be independent. As far as I can tell, the display scaling is exactly the same as my phone display… My phone is set to a zoom level higher than 100% because I don’t like to squint to read text… this makes sense on my ~6 inch display, but is a bit absurd on an external monitor. I could not find a way to have the external display use a more reasonable zoom level.
I might make some time to send direct feedback to Google about this, and hopefully, they listen and are continuing to improve this feature for upcoming versions of Android.
PS. Hopefully, this is not too badly formatted. While it was possible to compose this on the phone with a keyboard and mouse, it was a bit constrained due to the limited multitasking abilities. I also couldn’t figure out how to resize an image for insertion into this post, for example, probably due to this being something I don’t regularly do on a phone.
Kingston DataTraveler Kyson, marketed as a high-performance USB flash drive with read speeds of up to 200MB/s and write speeds of 60MB/s. I have a 128GB unit purchased directly from Kingston.
Here are some notes about real life performance of the Kingston DataTraveler Kyson USB Flash Drive that might be of help in informing your purchase decision.
The specs of my windows PC aren’t important. It’s a 2020-era AMD AM4 machine and has no trouble reading or writing at speeds far in excess of what this flash drive tops out at. Flash drive is also connected to a USB 3.0 port, so there are no fundamental bottlenecks here.
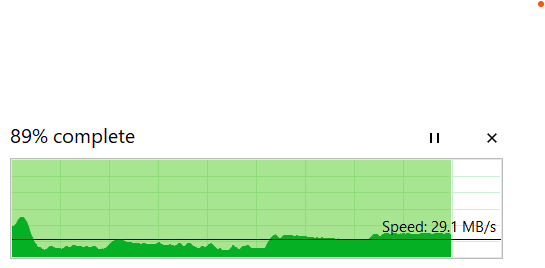
While copying a 40GB file to this drive, the write speed at which file transfer spent the most time at was just shy of 30MB/s.
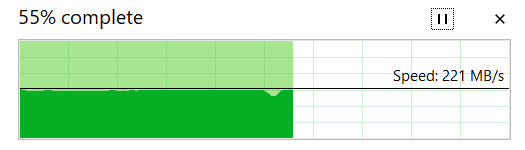
The read speed tracked slightly higher than rated at 220MB/s for the same file being copied from USB to internal SSD.
An attempt to run CrystalDiskMark 8 on the flash drive using a 32GB file spent over 10 minutes “preparing…”, and so I cancelled it, as I did not think it would add any further value to the above information.
I’ve been living with three Chromecast with Google TV devices for over a year now. Here are some of the challenges that Chromecasts have that you may not find just by reading reviews.
It is sluggish
The device is sluggish and unpredictable in day to day usage. Sometimes it responds fast, and other times it freezes, just enough to cause you to double or triple-press a button and wind up where you did not expect to while navigating the UI. To deal with this a bit better, I resorted in setting my profile into App-only mode. It’s possible that the newer device that Google sells, the Google TV Streamer is better, but I have not yet had a chance to live with one to compare.
Bluetooth Audio is Unreliable
I have a pair of mid-range Sony headphones, sometimes it’s helpful to others in the home to use headphones while watching TV. This is something that is impossible with all my three devices. The audio frequently drops out or becomes choppy and ruins the pacing of the content you’re watching. It’s effectively impossible to use my bluetooth headphones with this streamer. It’s an interesting issue, because my headphones work just fine with everything else I have tested them with, including 2 different Google Pixel phones, an ipad, a PC and a Macbook.
You have to power-cycle often
There’s something fundamentally wrong with the devices that causes them to crash or fail to display anything when waking up from sleep. It can happen often and intermittently, but not necessarily predictably. You are forced to power-cycle the device whenever this happens. There is a decent workaround for this particular issue though.
It is not a Law-Abiding Citizen over HDMI
Several things wrong with this device’s HDMI behaviour, including the failure to properly initialize on wake-up that I already covered. The other issue is that it regularly steals focus, and forces your TV to switch inputs to the Chromecast even if you did not request or want this.
The dongle will steal HDMI focus whenever it powers up or detects that you have turned on your TV. This is bad, because you can turn on your TV for many reasons that have nothing to do with the Google device, yet it forces your TV to switch input to the one that the dongle is connected to. One common annoyance for me, is that I power on my gaming console, and the chromecast immediately steals the focus just as the PIN input screen appears on the console. I’m forced to input the pin blindly, or to look for a remote to switch the input back to the desired input. There is no way to stop the chromecast from doing this.
The other way that this is a problem is that I have a large “network” of HDMI devices, including an AV-Receiver. The chromecast does not respect the power off command, *unless* the power off command was initiated by the chromecast remote. If you turn it off any other way, it powers right back up and steals HDMI focus, and this prevents even power-saving modes from working as intended.
The device manufacturer appears to be either unaware of any of these issues, or unwilling to even acknowledge and address them.
Profile Management Needs Improvement
You can create multiple user profiles and switch between them. Crucially, you can create profiles for kids and limit apps, but you can’t link profiles within apps to Google TV OS profiles. So for example, you could have a child account on Netflix, but you cannot restrict your Child’s Google TV OS profile to their child account. Every app has its own mechanism for managing profiles and setting parental controls. It’s a giant mess and nobody bothers to use them.
Yes, I understand why this is so, and it’s not an acceptable excuse. Google controls the OS and has rules in place for what apps it allows on the store. They could start to fix this at any time they want by desinging a unified mechanism for the OS, and putting the right policies in place for apps that are accepted on the platform.
Switching profiles requires a lot of steps, on a device which is already not very responsive.
Power-cycling the device can allow a child to bypass profile lock, even if you have set up all the content restrictions necessary. Kids can sign out of youtube, and by so doing, evade any content restrictions that you have put into their curated Google Profile that you built, and crucially, removing the ability for you to get a report of what they’re watching so you can review and discuss with them if needed. Youtube is a bit unique in that you can watch it without an account or a subscription, and if you’ve tried to watch youtube without an account, you might get a picture of the kind of crap that it throws at you. This puts you in a tough spot — your kid wants to watch minecraft and other gaming videos, they’ve outgrown youtube kids, you want them to be able to watch said minecraft videos and you’ve had discussions with them about responsible use of Youtube, but you cannot put in place any guardrails. Pfft!
A lot of hot air gets thrown about regarding parental controls and how it’s not the role of the government etc etc… it’s not too much to ask for tech platforms to provide tools that work for setting limits and being able to review activity on an account.
I’ve been on an adventure, trying to catalogue and measure the bandwidth usage of the devices on my network by using IPFIX from a Mikrotik router and a collector based on nfacctd. I’m making good progress on the the project. More updates to come soon, as I’m now working on the UI bits for viewing the stats.
During this process, I have found out that my Nest Doorbell Camera is generating a new IPv6 address for itself at an alarming rate — more than 50 distinct IP addresses I’ve counted in a single day by matching to the MAC address of the device. This corresponds to around 102MB of total upload and download bandwidth used — an insane number of new IP addresses for something that isn’t very chatty.
Some research leads me to believe that the device is taking the idea of privacy a little too seriously by aggressively implementing RFC 4941. This is quite bizzare — the doorbell camera only connects to properly secured and locked-down endpoints that Google operates, and the home user’s apps connect to some other secure relay service in order to view the camera’s feed, so whose privacy are they trying to protect, and from whom?
Dear Google, please stop polluting network logs by generating a new IPv6 address too frequently, and more importantly, give users an option to disable this feature. Even RFC 4941 acknowledges that an entity that wishes to track an IPv6 user by IP address can simply track the prefix of the network, which provides the same level of granularity that can be had through IPv4.
My homebrew router got fried by Lightning a couple of years ago during a thunderstorm, and facing budget constraints and limited time, I did not replace it with another homebrew router. I decided to get a Mikrotik router because I was curious about Mikrotik, and the price for the hardware + RouterOS license seemed cheaper than what it would cost to buy a new mini PC to build another homebrew router.
This is all well and good, and has been running my home network just fine, but it lacks a bandwidth monitor for my home network. I have decided to try to solve this problem with a bit of a DIY solution, and this is the first blog post documenting the first step of what will eventually become a complete bandwidth usage counter for my home network.
Requirements
A machine to host/run the netflow or ipfix receiver. I happen to have a Raspberry Pi 5 with a high-endurance MicroSD card, and I think it will do the job just fine, and none of this data is critical.
Software to receive the IPFIX data from your mikrotik router. PMAcct has an excellent netflow collector, and it is free and open source software with which I have some very basic experience.
Mysql or Maria DB for storing the data and querying it for reporting.
Consult your search engine or AI assistant of choice for help with deploying and configuring a mysql instance if required.
My first step is simply to have the traffic data collected somewhere, I will worry about visualization in a future blog post.
Note that I use pmacctd/nfacctd a bit interchangeably sometimes. pmacctd is the daemon that handles traffic via pcap while nfacctd handles netflow. The project is named pmacctd.
The Recipe
Assuming you have a fully functional raspberry pi that is up to date and accessible on your network at 192.168.1.35.
Install Pmacct
apt install pmacct
Configuration for Pmacct/nfacctd
Because we’re configuring a netflow receiver, we’re working with nfacctd here which is part of the pmacct collection. We will update the default file shipped in /etc/pmacct/nfacctd.conf . It is wise to stay with default files so that we can easily leverage the built-in systemd unit files later on.
! nfacctd configuration!!!daemonize:truedebug:falsepidfile:/var/run/nfacctd.pidsyslog: daemon!! interested inin and outbound trafficaggregate[in]: src_host, dst_host, proto, tag, src_mac, dst_mac,vlan, src_port, dst_port, post_nat_dst_host, post_nat_dst_port, post_nat_src_host, post_nat_src_port! replace zzz.zzz.zzz.zzz with your public IPv4 address. ! and do the same for your ipv6 address if you have one, or remove the condition.aggregate_filter[in]: dst host zzz.zzz.zzz.zzz or dst net 2a02:xxxx:xxxx::/48aggregate[out]: src_host, dst_host, proto, tag, src_mac, dst_mac,vlan, src_port, dst_port, post_nat_dst_host, post_nat_dst_port, post_nat_src_host, post_nat_src_portaggregate_filter[out]: src net 192.168.1.0/24 or src net 2a02:xxxx:xxxx::/48sql_user: routersql_passwd: routersql_db: routersql_host: localhostplugins: mysql[in], mysql[out]sql_optimize_clauses:truenfacctd_port:2055sql_refresh_time:120sql_history: 10msql_history_roundoff: mhsql_table_version:2sql_table[in]: inbound_%m%Ysql_table[out]: outbound_%m%Ysql_table_schema[in]: /etc/pmacct/inbound.sqlsql_table_schema[out]: /etc/pmacct/outbound.sql
Partial explanation of the nfacctd.conf
We’re setting nfacctd to run as a daemon without debug, and to write log output to syslog. Note, on many modern linux systems with systemd, the log file is binary, and you have to use journalctl -f to see and follow the syslog output in realtime.
We have configured nfacctd to use a user called router with the same password to connect to a database of the same name, only on localhost. Please ensure that this meets your security requirements. For my use case, the raspberry pi is accessible only on my LAN, and the user account I have created only has privileges granted on the router database, so this configuration is secure enough for my home network. These options are defined with the “sql_” lines.
The sql_table_ lines allowed me to configure nfacctd so that it creates one table for inbound traffic stats, and another table for outbound traffic stats. The tables are named by month and year, for example, the table containing inbound traffic stats for June 2024 would be named: inbound_062024, and one for outbound would be outbound_062024. I have configured it this way to keep a limit on how large the tables could grow, and make it easier to delete old tables once the stats have been processed for reporting purposes.
The traffic of interest is identified with the aggregate_filter[in] and aggregate_filter[out] configurations on line 15 and 16. It uses a syntax similar to tcpdump (but I have found that it doesn’t accept all filters that tcpdump would accept. My network supports both IPv6 and IPv4, so my filters for outbound traffic match for LAN traffic originating from my network.
The aggregate_filter[in] configuration is configured this way because even though IPFIX contains the post-NAT information, I could not find a way to have nfacctd filter on that field. The workaround is to simply match all traffic inbound to the public IPv4 address of the router, and capture the post-nat IP and port details to the inbound table where post-processing later on can handle it correctly. We also capture the mac address of the client on the outbound side, because this info is available, and allows us to match ipv4 addresses to their ipv6 address when they share the same mac address.
The debug flag can be flipped to true if things aren’t quite working right, and you need to test things out.
We are using the sql_table_version 2 because it provides the primitives that are sufficient for our purpose. The aggregation command you provide needs to match include all the fields that are required for the table schema.
Please refer to the configuration reference for further details about the configuration file
Additional Files
You need to provide an SQL template for the outbound table and the inbound table that we have specified above as our preference.
File content for /etc/pmacct/inbound.sql
# ***********************************************# place this content in/etc/pmacct/inbound.sql## ***********************************************# this is the file pointed toby the *sql_table_schema[in] configurationin# line35 of the nfacctd.conf file#remove the commentscreatetableinbound_%m%Y ( agent_id INT(4) UNSIGNED, mac_src CHAR(17) NOT NULL, mac_dst CHAR(17) NOT NULL, vlan INT(2) UNSIGNED NOT NULL, ip_src CHAR(50) NOT NULL, ip_dst CHAR(50) NOT NULL, src_port INT(2) UNSIGNED NOT NULL, dst_port INT(2) UNSIGNED NOT NULL, ip_proto CHAR(20) NOT NULL, post_nat_ip_dst VARCHAR(50) DEFAULTNULL, post_nat_port_src INT(2) DEFAULTNULL, post_nat_ip_src VARCHAR(50) DEFAULTNULL, post_nat_port_dst INT(2) DEFAULTNULL, packets INT UNSIGNED NOT NULL, bytes BIGINT UNSIGNED NOT NULL, stamp_inserted DATETIMENOT NULL, stamp_updated DATETIME,PRIMARY KEY (agent_id, mac_src, mac_dst, vlan, ip_src, ip_dst, src_port, dst_port, ip_proto, post_nat_ip_dst, post_nat_ip_src, post_nat_port_dst, post_nat_port_src, stamp_inserted));# observe that the tablename has %m%Y which matches the naming format for our tables.
File content for /etc/pmacct/outbound.sql
# ************************************************# place this content in/etc/pmacct/outbound.sql## ************************************************createtableoutbound_%m%Y ( agent_id INT(4) UNSIGNED, mac_src CHAR(17) NOT NULL, mac_dst CHAR(17) NOT NULL, vlan INT(2) UNSIGNED NOT NULL, ip_src CHAR(50) NOT NULL, ip_dst CHAR(50) NOT NULL, src_port INT(50) UNSIGNED NOT NULL, dst_port INT(2) UNSIGNED NOT NULL, ip_proto CHAR(20) NOT NULL, packets INT UNSIGNED NOT NULL, post_nat_ip_dst VARCHAR(50) DEFAULTNULL, post_nat_port_src INT(2) DEFAULTNULL, post_nat_ip_src VARCHAR(50) DEFAULTNULL, post_nat_port_dst INT(2) DEFAULTNULL, bytes BIGINT UNSIGNED NOT NULL, stamp_inserted DATETIMENOT NULL, stamp_updated DATETIME,PRIMARY KEY (agent_id, mac_src, mac_dst, vlan, ip_src, ip_dst, src_port, dst_port, ip_proto, post_nat_ip_dst, post_nat_ip_src, post_nat_port_dst, post_nat_port_src, stamp_inserted));
Create another table manually by executing this SQL on your database where we will eventually have pre-processed data to help speed up reporting. The two tables above will only hold relatively raw data which would need further processing depending on the kind of reporting you need to perform.
-- Table structure for main statistics cache/summary.CREATETABLE `main_summary` (`id`bigint(20) unsigned NOT NULL AUTO_INCREMENT,`ip`varchar(50) NOT NULLDEFAULT'0',`mac`CHAR(17) DEFAULTNULL,`duration_type`varchar(10) NOT NULLDEFAULT'0',`duration`varchar(12) NOT NULLDEFAULT'0',`bytes_in`bigint(20) unsigned DEFAULT'0',`bytes_out`bigint(20) unsigned DEFAULT'0',`stamp_inserted`datetimeNOT NULL,PRIMARY KEY (`id`),UNIQUEKEY`ip_duration_type_duration` (`ip`,`duration_type`,`duration`),INDEX (duration),INDEX (ip)) ENGINE=InnoDB DEFAULT CHARSET=utf8 COMMENT='duration type specifies whether this is a state for day, month or year. \r\n\r\nthe duration field specifies which unit of the duration the stat covers. Example, for a duration_type = day, then the duration field will contain "2018-10-15" meaning the stats are for the 15th of October 2018. For duration_type = month, you should expect "102018" meaning october 2018.'
Configure Mikrotik to send IPFIX info
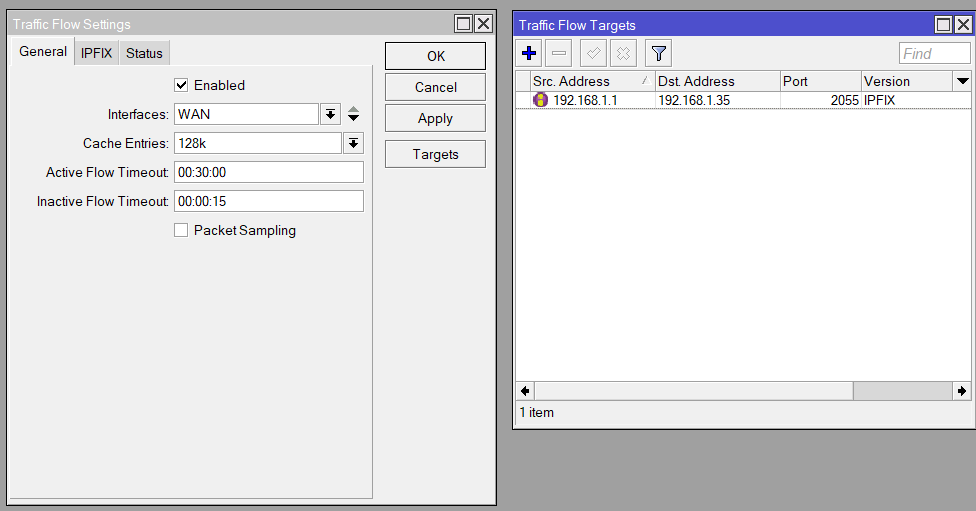
I use a GUI for my Mikrotik router, and the configuration for Traffic Flow can be found in the IP > Traffic Flow section. Here’s what I did:
Enabled: checked
Interfaces: WAN
Cache Entries: 128k (default value)
Active Flow Timeout: 00:30:00 (default value)
Inactive Flow Timeout: 00:00:15 (default value).
Configure a Target as well. See photo. Make sure that the Source IP address is set to the router’s IP on the LAN otherwise nfacctd ignores the traffic. My nfacctd is configured to listen on port 2055, and my raspberry pi is 192.168.1.35.
Test nfacctd
Open two terminal windows to the machine running this service. In one terminal, execute
sudo nfacctd -f /etc/pmacct/nfacctd.conf
In the other terminal window, watch the syslog
sudo journalctl -f
You may need to filter or grep the logs if your system is noisy and has a lot of other traffic going to syslog.
You’re looking for log messages from nfacctd that say its purging cache. Here is a sample from my machine.
Jun 30 16:06:02 vortex nfacctd[1954]: INFO ( out/mysql ): *** Purging cache - END (PID: 1954, QN: 348/348, ET: 1) ***
Jun 30 16:08:01 vortex nfacctd[1961]: INFO ( out/mysql ): *** Purging cache - START (PID: 1961) ***
Jun 30 16:08:01 vortex nfacctd[1962]: INFO ( in/mysql ): *** Purging cache - START (PID: 1962) ***
Jun 30 16:08:01 vortex nfacctd[1962]: INFO ( in/mysql ): *** Purging cache - END (PID: 1962, QN: 102/102, ET: 0) ***
Jun 30 16:08:01 vortex nfacctd[1961]: INFO ( out/mysql ): *** Purging cache - END (PID: 1961, QN: 363/363, ET: 0) ***
This happens every 2 minutes (120 seconds) from my configuration, you can set an earlier, or later time if desired. A shorter time means a mysql query is executed more often, a longer duration means that there is more data at risk of loss if the system is interrupted before the data can be committed to disk. Again, this is not valuable data, in a home use case, so there is no need to hammer the disk. I’ve chosen 2 minutes simply because the quick start guide for pmacct used 2 minutes.
There should also be some tables created for ‘inbound_MMYYYY’ and ‘outbound_MMYYYY’ by now with some data in it.
Automatically Start nfacctd on Boot
Since we have mostly stayed within the default system configuration files for pmacct, it is very easy to enable the pre-configured Systemd service to launch the daemon at system startup:
sudo systemctl enable nfacctd.service
That’s it, you now have traffic information being sent to your raspberry pi, getting aggregated and stored in a mysql database.
Stay tuned
Next on the agenda is to come up with a system to allow you to visualize how much data each host on your network is consuming per day, week, month or year.
To give you a hint of the kinds of things that might need doing if you’re reading this now and need this solved before I can get around to documenting my DIY solution, you can find out hos much data has been used since the start of the current month by running a query such as:
TinyMCE is a nice wysywig editor, and in my experience, is more performant with large, rich text content than Quill, which is the default editor used by the Primevue framework.
If you want to use TinyMCE with your VueJS 3 project, unfortunately, the documentation is not very great about how to do this. Here is what worked for me (using the composition API).
Install Dependencies
It is important to install tinyMCE and tinyMCE-vue exactly as follows:
After it is installed, then you need to load TinyMCE and TinyMCE-vue in your component in a specific order, otherwise it will load the cloud version, which requires a License key.
If you have the means to support the project, please do so, but it is a little annoying that it is difficult to use the GPL version of the library without inadvertently loading the cloud version.
<scriptsetup>//import the usual components you're using, including Vue//... then import the tinymce bits like so:import tinymce from"tinymce";import"tinymce/icons/default/icons.min.js";import"tinymce/themes/silver/theme.min.js";import"tinymce/models/dom/model.min.js";import"tinymce/skins/ui/oxide/skin.js";import"tinymce/skins/ui/oxide/content.js";import"tinymce/skins/content/default/content.js";import"tinymce/skins/ui/oxide/content.js";import Editor from"@tinymce/tinymce-vue";</script><template><Editorv-model:visible="modalContent":init="{promotion: false, branding: false, license_key: 'gpl', height: '400px', skin: 'oxide', skin_url: 'default' }" ></Editor></template>
The chromecast with Google TV is a low-ish priced, decent dongle if your TV has a great display but the UI is slow or outdated. I have three of them, and two of them are mostly okay, except that one of them regularly goes into a state where there is no signal on power up. The symptoms are quite similar to those described on this thread: https://www.reddit.com/r/Chromecast/comments/147ziqx/chromecast_with_google_tv_no_hdmi_signal/
It appears to be more common with users of Sony TVs, and the device fails to correctly initialize the TV when waking up from sleep. That’s the clue. It has all the hallmarks of a software defect, but Google’s support will waste your time and make you perform pointless device resets, and then offer you a warranty replacement if your device is still in warranty — otherwise, you’re on your own.
This annoyed me enough that I briefly considered ditching my Pixel phone, buying an iPhone and replacing all the media devices in the house with Apple TV 4Ks… but I still find iOS a frustrating enough experience on an iphone that I decided to try another tactic to fix the issue.
How to fix it
You simply need to find your way into the Power management settings of the chromecast and disable Idle standby.
Navigate to device Settings
Select the “System” option.
Navigate to “Power and Energy”
Set “When Inactive” to “Never”.
The device never goes to sleep, and as far as my testing goes, doesn’t get back into the state where the HDMI handshake with the TV fails, thus, switching inputs to the Chromecast initializes the display correctly and you don’t need to power cycle.
As far as power consumption, it’s got a 7.5 watt power supply, and so in the worst case, it would use 65.8KW of energy a year if it were running at full power consumption throughout. The worst case is not the typical case. You do the math and decide if you’re okay with this. I am fine with this, and I save energy in other ways around the house.
You have already deployed Lets Encrypt certificates for your web server and you have a mysql server hosted on the same domain and wish to also leverage this certificate for TLS connections to your mysql instance. Read on.
Set Folder Permissions
Make sure that your Lets Encrypt installation has permissions that allow access to users other than root for the certificate and chain.
as of this writing (2023-12-21 13:00 UTC), the documentation of Lets Encrypt: https://eff-certbot.readthedocs.io/en/latest/using.html#where-are-my-certificates informs you that you should set the permissions for the live and archive directories in your installation to 755 if you don’t intend to downgrade versions — this should be an easy yes for most people, as if you find yourself in a situation where you intend to downgrade your certbot, then you presumably know what you’re in for.
chmod 0755 /etc/letsencrypt/{live,archive}
Allow Mysql User to Read the privkey.pem
Find out which user your mysql is running as. This can be found in your mysqld.conf or similar, for example:
#...
[mysqld]
#
# * Basic Settings
#
user            = mysql
#...
On my machine, the configuration indicates that mysql is running as a user named mysql.
Users are typically created together with the same name group. I can use ACLs to grant Mysql group access to the private key generated by Lets Encrypt for my domain with the following command without opening the file up to everyone:
Just as a quick explainer, Lets Encrypt will put the currently active version of the certificate and private key etc in the /etc/letsencrypt/live/$domain/ directory, and this naturally will vary by your domain. If this is not the case, you should look at the current Lets Encrypt documentation for where it is placing files as this could change in the future. The goal here is to make sure that Mysql is allowed to read the private key. You don’t want to change the file permissions to be permissive because the private key is a very sensitive file and you don’t want this falling into the wrong hands.
Create the CA File for Lets Encrypt
The CA file at it’s simplest is the Root Certificate which you can obtain from Lets Encrypt. We will create a file containing the Root (self-signed) and the Intermediate (self-signed) certificates for Lets Encrypt which you can download from: https://letsencrypt.org/certificates/ .
Use a text editor of your choice and place the Root Certificate for Lets Encrypt AND the intermediate certicate into a single file named for the purpose of this exercise, ‘ca-cert.pem’, which I have chosen to place in /etc/letsencrypt/. As of now, the current CA files I used are: https://letsencrypt.org/certs/isrgrootx1.pem AND https://letsencrypt.org/certs/isrg-root-x2.pem.
The wget commands below will create this file if you supply the valid URLs to the current CA certs.
Note that the path above depends on your environment. My example is using my domain. You may wish to for example, have Mysqld have access to all live letsencrypt certs, and in such a case, you would need /etc/letsencrypt/live/** r, and /etc/letsencrypt/archive/** r, instead, which grants access recursively to all files and subdirectories in the live directory. We need access to the archive because ultimately, the files in live are merely symlinks to the files in archive.
After modifying an AppArmor profile, you need to reload it:
The key things you need to do differently from are:
ssl-cert should point to the cert.pem file. You cannot use the fullchain.pem because Mysql doesn’t select the correct certificate from a chain as of my current version 8.0.35. Instead, you can create a CA file as described above that contains all the certificates needed to establish a chain up to the trusted root.
ssl-key should point tothe private key to the privkey.pem
ssl-ca should point to the /etc/letsencrypt/ca-cert.pem file you generated earlier using the Root certificates for
You would also need to ensure that your server is listening on the right address and that secure connections are required.
This site uses cookies, mainly to provide basic functionality and some analytics (so that I can see how busy the site is, and which pages are popular). By continuing to use this site, you have agreed to the use of cookies. You can close this window/tab if you do not wish to browse this site. ☒