Like Mikrotik but don’t speak Mikrotik CLI eh? I’m with ya.
I took advantage of a deal and joined Sky for broadband. I’ll spare you the details, but even though they don’t offer fixed price contracts, the fact that they don’t use PPPoE and the generous new customer offer swayed me, and I think over the length of the contract, it works out cheaper than my previous provider.
This post was helpful in convincing me that it was possible to use my own router since I really don’t want the disruption of having to reconfigure my entire home network, which is filled with smart devices that don’t have great interfaces for updating connection settings. I extracted my username and password using wireshark, even though it’s argued that it’s not necessary — better to have the real credentials, since it’s straightforward to capture them.
You should go read that blog post if you don’t yet have IPv4 internet access from Sky over your Mikrotik. Think of this post as as a supplement that covers only IPv6 connectivity.
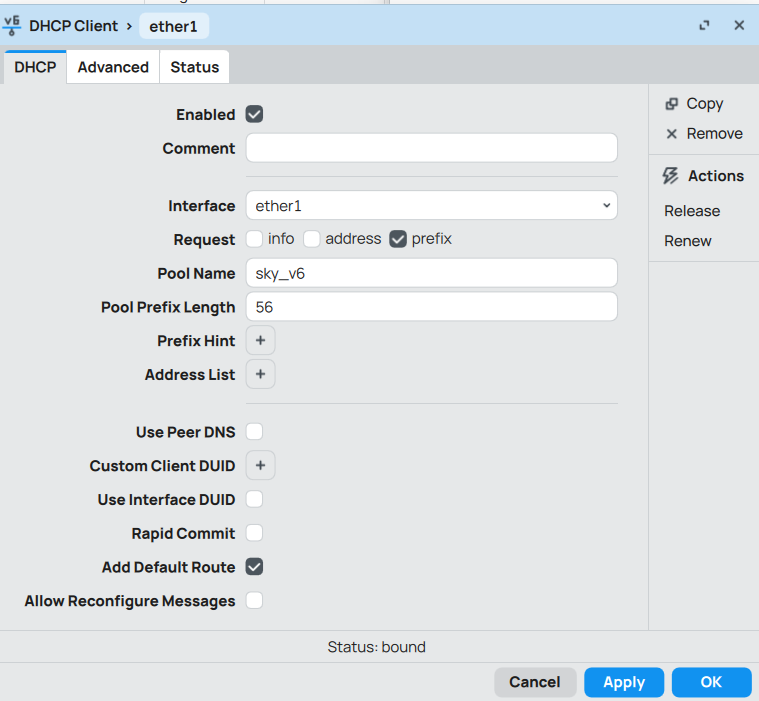
Only the clientid – option 61 appears to be required, and you set that to the same value as described in the linked blog post above. Request ‘prefix’ only, and choose a name for the pool and set prefix length to 56 — see screenshot.
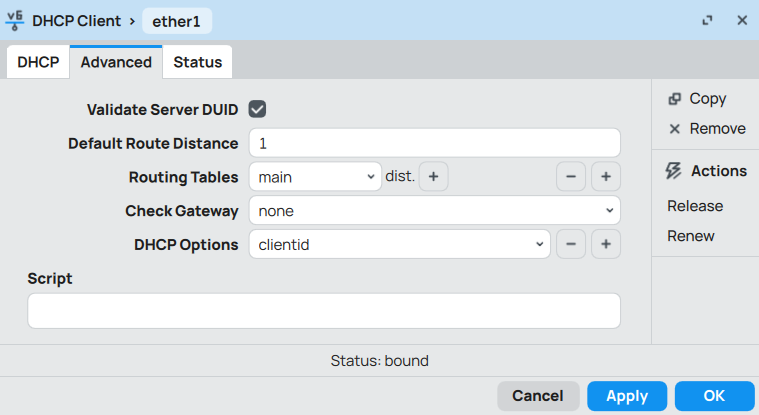
On the advanced tab, I simply selected that it should send the clientid option:
That was enough to get a prefix bound within a few seconds. The prefixes seem to renew every hour, but as far as I can tell, the prefix has not changed since it was first acquired.
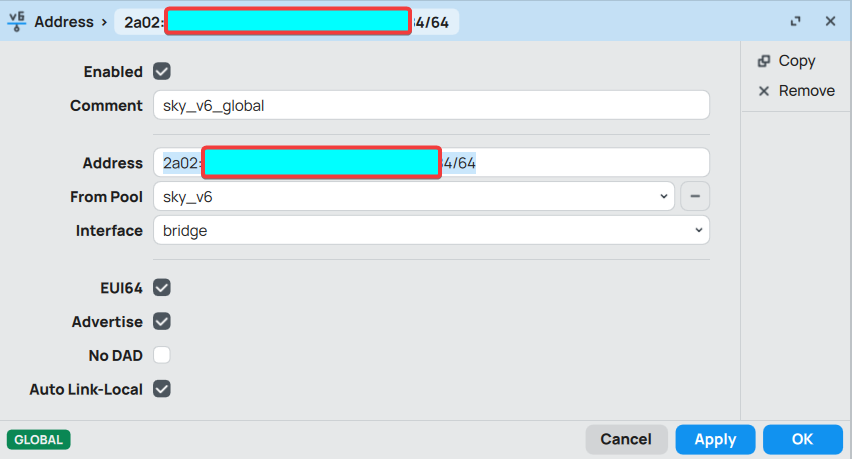
The final piece of the puzzle is to assign an IPv6 address on your “bridge” (LAN). This means you go to the IPv6 > Addresses and create a new address. On my router whose model is irrelevant, ether1 is designated as my WAN port, and the remaining ether2 to ether5 are all part of a “bridge” which serves as the LAN part of my network. The interface name for the bridge is conveniently called “bridge”, so you need to assign an IPv6 address from your prefix to the bridge. Really, all you need to specify is “::1/64” as the Address, set the Pool you created in your DHCPv6 client as the “from pool” value, and select “bridge” as the interface and Mikrotik will automatically generate a /64 subnet, and assign the first address to the interface once you hit apply.
The other values were left as their defaults.
Once this address was assigned, the hosts on the LAN automatically acquired an IPv6 address and were able to reach IPv6 only sites.
This doesn’t cover any additional configuration you might need for IPv6 — the Mikrotik wizard creates a reasonable default set of firewall rules and you can explore the web for any further customisation tasks.
Discover more from nucco.org
Subscribe to get the latest posts sent to your email.